Stained Glass Art
Materials
- Glitter glue
- Toothpicks or paint brushes
- Food coloring (we used neon)
- Picture frames (we used 5x7 frames)
- Suction cup hangers
Instructions
- You want to begin by disassembling the frame. The cardboard back to the frame doesn't get used for the project so you can set it aside.
- Clean the glass with some glass cleaner and then place it inside the white frame.
- Grab hold of the hanging tab.
- Once the frames are ready to go, cover your work surface. I used wax paper and newspapers on top of that.
- Then, I set out the glitter glue, toothpicks and food coloring, and called in the troops.
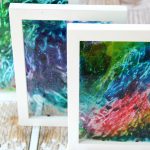
- Position your frame so the back is facing up.
- Squirt glue all over the glass. There is no rhyme or reason here. Add a little, add some more.
- Add one drop of food coloring at a time to various parts of the glass. I wouldn't suggest putting all of the colors in one place or you'll just end up with a black puddle on your glass.
- You can use a toothpick to blend the colors into each other and create some swirl or line designs. Here's where the kids can get real creative.
- Once you're happy with your design, allow the glue to dry overnight.
Notes
- Glass Cleaning: Ensure that the glass surface is thoroughly cleaned with glass cleaner before starting the project. Any dirt or residue on the glass can interfere with the adhesion of the glitter glue and affect the overall appearance of the stained glass art.
- Color Placement: When adding food coloring to the glitter glue, distribute the colors evenly across the glass surface. Avoid concentrating all the colors in one area to prevent them from blending into a muddy color. Experiment with different patterns and designs to create vibrant and visually appealing stained glass effects.
- Drying Time: Allow sufficient drying time for the glitter glue to set completely. Overnight drying ensures that the colors remain vivid and the glue adheres firmly to the glass surface. Rushing the drying process may lead to smudging or uneven drying, affecting the quality of the finished stained glass art.