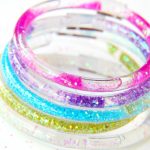
Glitter Friendship Bracelets
Materials
- ¼ Clear vinyl tubing
- Baby oil
- Water
- Scissors
- Assorted colored glitter
- Oral medication syringe
- Mini funnel
- E6000 Craft Adhesive
Instructions
- Measure out and cut how much of the ¼" tubing you'll need to fit the child's wrist. Then, cut a small piece of the ⅜" tubing to act as the "connector" piece (see a close up photo of how this works in Step 6). Insert one end of the ¼" tubing in the ⅜" connector piece. Apply some of the adhesive into the open end of the connector piece. Allow to dry 10 minutes.
- Insert the end of the mini funnel or syringe into the other side of the ¼" tubing without the connector.
- Pour glitter into the funnel and fill the tubing about ¾ full (If you want more movement within the bracelet, don't add as much glitter).
- Fill your syringe with half water, half baby oil (shake it a little to mix) and start filling the tubing until it covers the glitter completely and fills most of the tubing.
- While holding the ends of the tubing upright, apply a bit more adhesive to the connector end and insert the other end of the tubing into the connector to form the bracelet.
- And there you have it! How cool is that?! Now make some more!
Notes
- Select Safe and Non-Toxic Materials: Ensure the materials you use are safe, especially if making these bracelets with children. Opt for clear vinyl tubing that is non-toxic and free from harmful chemicals. When choosing glitter, look for non-toxic options specifically labeled as safe for crafts and skin contact. Additionally, use baby oil and water for the filling mixture, as these are gentle on the skin and safe for use in crafts.
- Experiment with Glitter Amounts: The amount of glitter you add to the tubing can impact the overall appearance and movement of the bracelet. If you prefer a more subtle sparkle, add less glitter to the tubing. Conversely, if you want a bold and dazzling effect, fill the tubing with more glitter. Experiment with different glitter colors and sizes to create unique and personalized bracelets that reflect each friend's style and personality.
- Allow Sufficient Drying Time: Patience is key when making these bracelets to ensure they hold together securely. Allow ample time for the adhesive to dry completely before wearing or handling the bracelets. Follow the manufacturer's instructions for the adhesive you choose and consider allowing it to cure for longer than the minimum recommended time to ensure maximum strength and durability. Once dry, the bracelets will be ready to share with friends and add a touch of sparkle to any outfit!