Homemade Soy Lip Balm
Yield: 20
Materials
- 4 tablespoons Coconut oil
- 3 tablespoons Shea butter
- 1 tablespoon Soy wax pastilles
- ½ teaspoon Vitamin E oil I got mine from Walmart in the vitamin section
- chunk of your favorite lipstick
- 8 drops essential or food-safe fragrance oil I used peppermint
- Medicine dropper
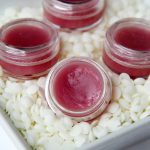
- 5 mL Lip balm containers
Instructions
- Put your wax, shea butter, and coconut oil into a microwaveable safe bowl (I used something disposable) and heat for 1 minute or until the soy wax is almost completely melted.
- Pull the container out of the microwave, add your vitamin E oil and lipstick and heat for another 20-30 seconds or until the lipstick chunk is melted.
- When everything is dissolved, mix in your essential oil, get out your medicine dropper and start filling the containers.
- Let the lip balm cool and harden. Now remember, because you're using coconut oil and soy this lip balm is subjective to melting if conditions get too warm.,
- When the lip balm has cooled for about an hour, dig right in and try it out.
Notes
- Microwave Safety and Heating Instructions: Ensure safety when melting the ingredients for your DIY soy lip balm by using a microwave-safe bowl or container. Heat the mixture in short intervals, checking frequently to prevent overheating. Stir the ingredients between intervals to ensure even melting. Be cautious when handling hot containers and ingredients, using oven mitts or kitchen towels to protect your hands.
- Customize with Lipstick and Essential Oils: Personalize your lip balm by adding a chunk of your favorite lipstick for color and essential oils for fragrance. Experiment with different lipstick shades to create custom-tinted lip balms, and choose essential oils with soothing or invigorating scents, such as peppermint or lavender, to enhance the lip balm experience. Adjust the amount of lipstick and essential oil according to your preferences for color and scent intensity.
- Container Filling and Cooling: Use a medicine dropper to fill the lip balm containers with the melted mixture, ensuring precise and mess-free application. Allow the lip balm to cool and harden completely before using or sealing the containers. Be patient during the cooling process, as rushing may cause uneven texture or premature solidification. Once cooled, test the lip balm to ensure it meets your desired consistency, and enjoy the moisturizing benefits of your DIY creation.