Want to Save This Recipe?
*This post may include affiliate links. Please see my disclosure.
Gah! I have spring fever already. Is that bad? The good news is I'm going to be basking in the sun in the Dominican Republic in just a couple weeks. The bad news is I'll have to return home to snow and frigid temps eight days later - I think that's going to make my spring fever even a bit worse.
Every year there comes a time, usually close to the end of winter, where I start craving color. I need to see color. I get so tired of the winter scene outside my back patio door, I do whatever I can to bring some color into my life.
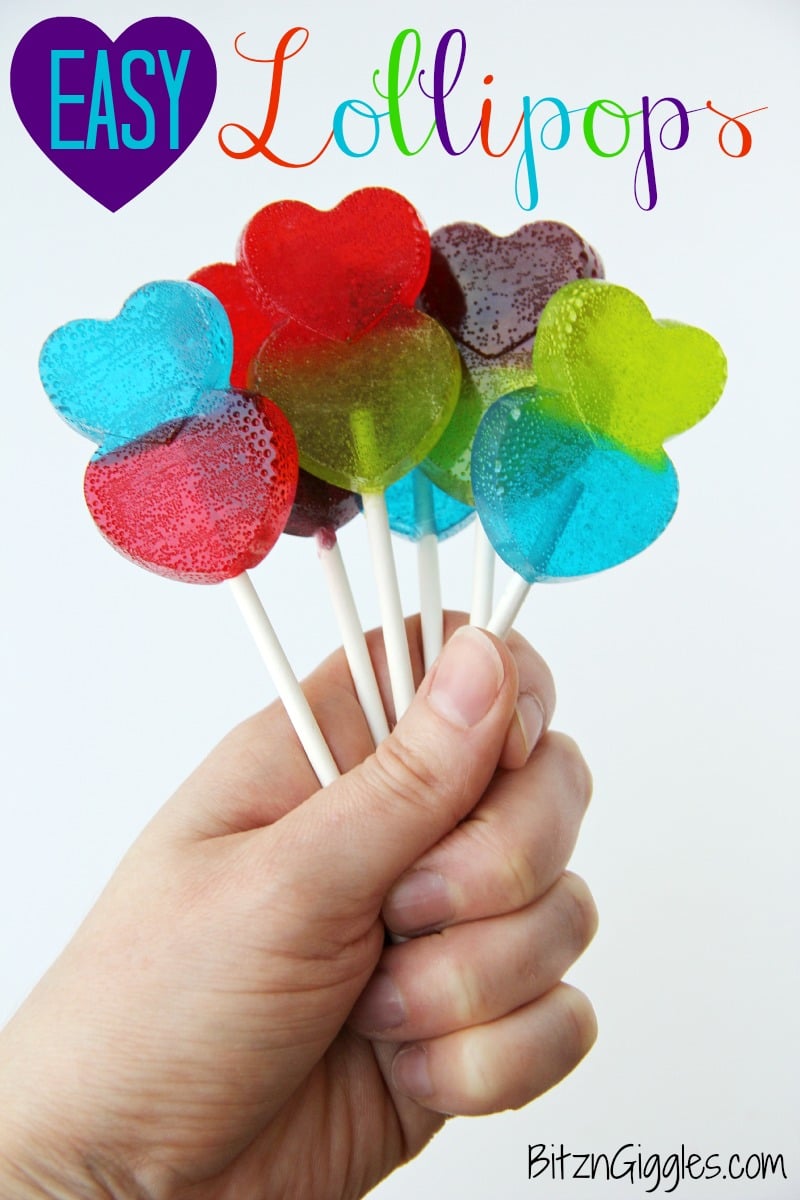
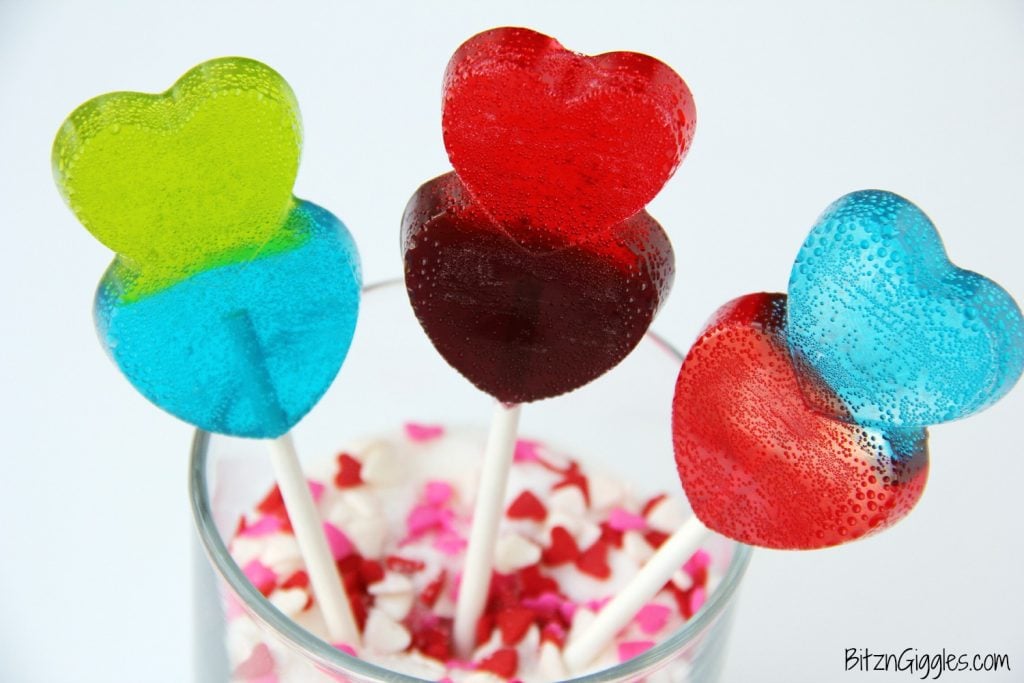
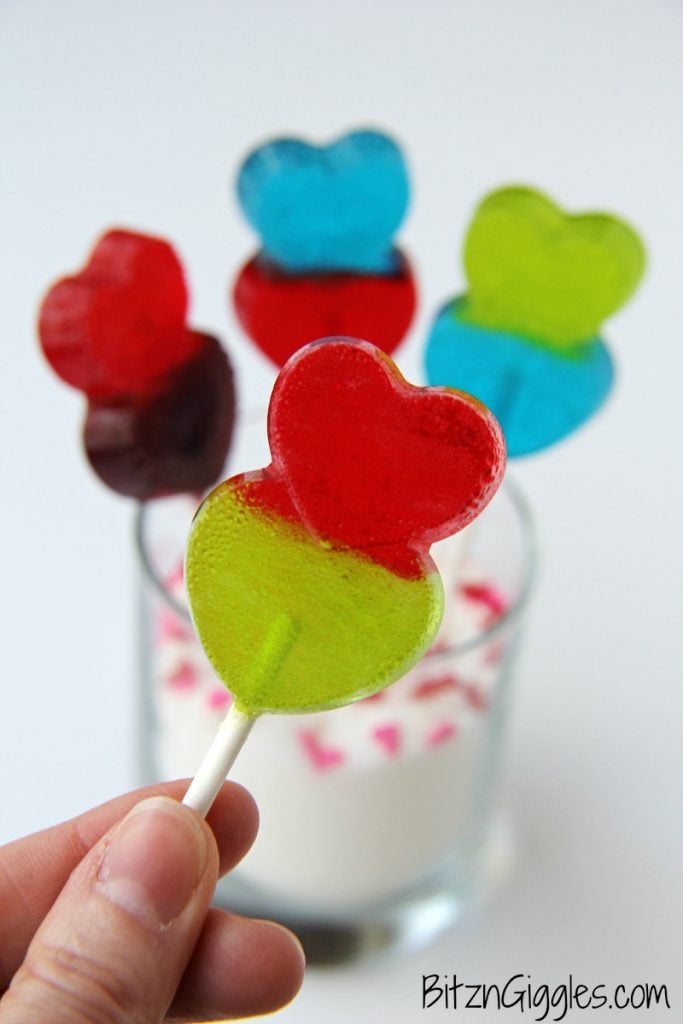
Last year I made these Rainbow Fruit Skewers when I was feeling the winter blues. This year, I made some Easy Lollipops. These little lollies are bursting with color, they're delicious and they are made with literally ONE ingredient, and in a way you may not have thought of. Psst. . .and they're perfect for Valentine's Day!
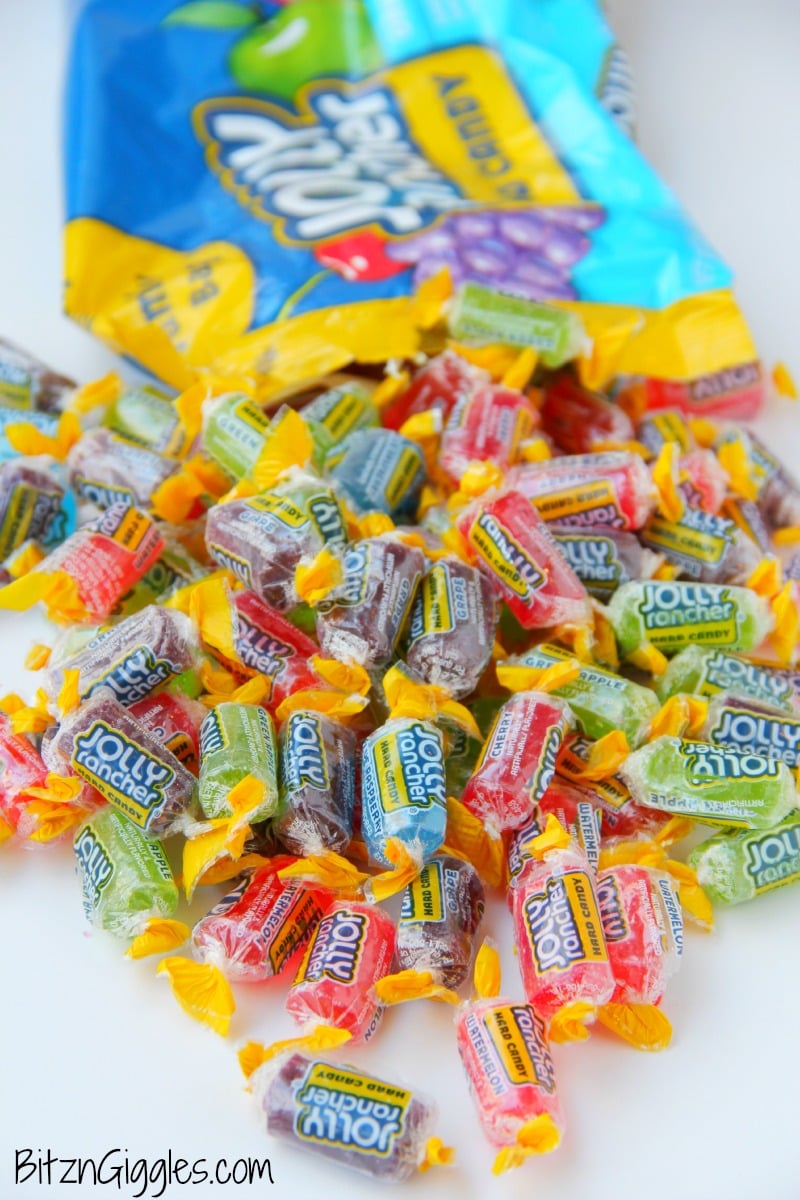
Jolly Ranchers. I've enjoyed Jolly Ranchers since I was a child. I'll admit that my favorite flavors haven't changed. Cherry has always been my favorite, followed by the blue raspberry. What ever happened to the lemon? Did no one like the lemon? I just can't seem to find them anymore.
ANYWAY, if you're from outside of the U.S. and you've never laid your eyes on these little candies, don't fret. Literally any hard candy will work. Heck, you can even use the sugar-free hard candies if that's what you like. You're allowed to be creative here and that's what I love about these easy lollipops.
Now, before you get all discouraged because you don't have a lollipop mold, I'm here to tell you that you don't need one. You can actually make these lollipops just by placing the candy on cookie sheets lined with foil and position the lollipop stick into the candy halfway through "melting time" in the oven. If you make them this way, I would just crush the candy into smaller pieces if I were to make the lollies without the mold.
Now, how much fun are these? They're so simple to make and a great activity to do with the kids so they can share them with their friends. How about making some of these to sell at a bake sale or a school event? Pretty awesome if you ask me.
I love easy ideas that turn into beautiful things - and this is certainly one of them.
So, go ahead, run and get those candies, preheat your oven and get started making these easy treats. Remember, you don't necessarily need a mold for these lollipops and the sticks you can find at Walmart or Target in the cake decorating aisle. Isn't it about time you brought some color back into your home this season? Start in the kitchen with these beautiful lollipops!
If you decide to make them without a mold, just remember to crush your candy into smaller pieces. Place your candy into a plastic bag and crush the candy into smaller pieces with a mallet or hammer before placing onto a foil lined baking sheet for melting. It's also a good idea to do the destruction outside. Please don't ruin your floors, counter tops or center island. Consider yourself warned. 🙂
Easy Lollipops
Ingredients
- Silicone Lollipop Mold (The heart mold I used doesn't seem to be available right now, but there are other options -Please DO NOT try using a plastic mold - it will MELT)
- 4-Inch Lollipop Sticks
- Any hard candy
Instructions
- Preheat your oven to 300 degrees Fahrenheit.
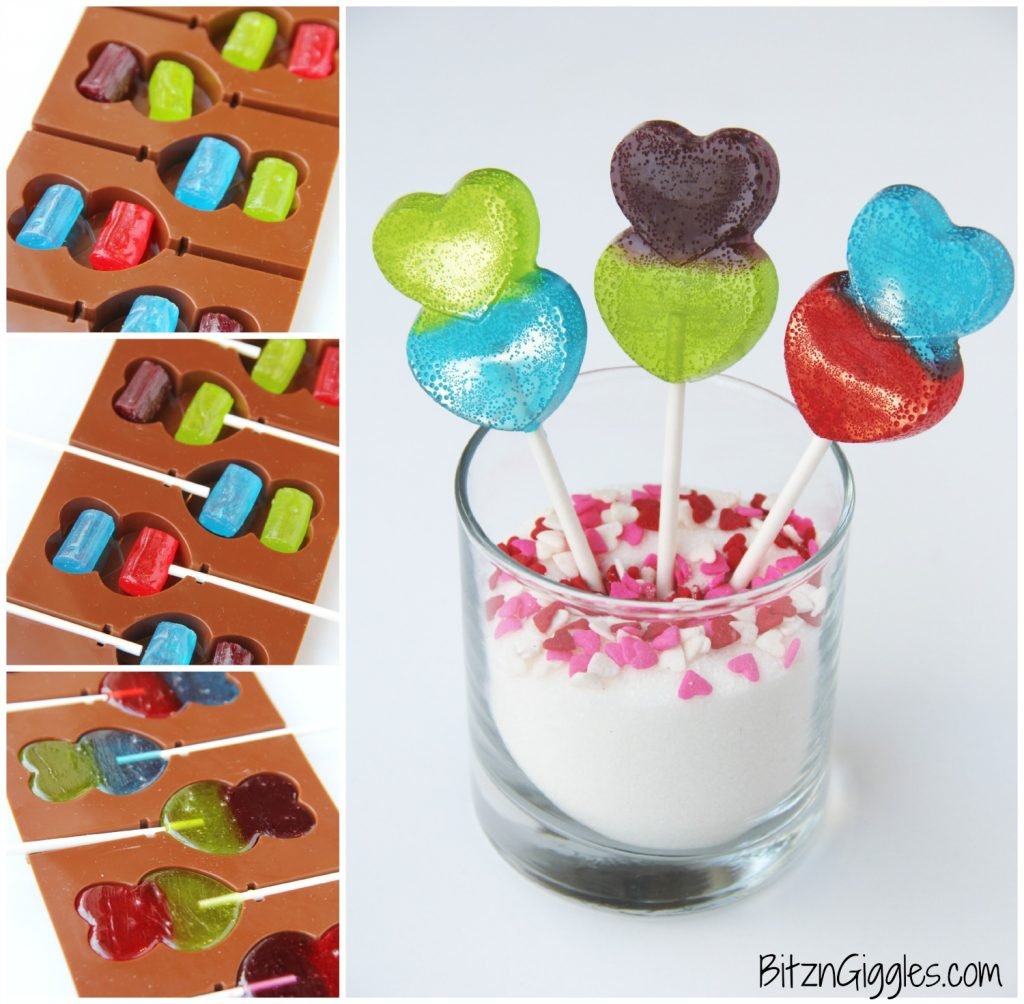
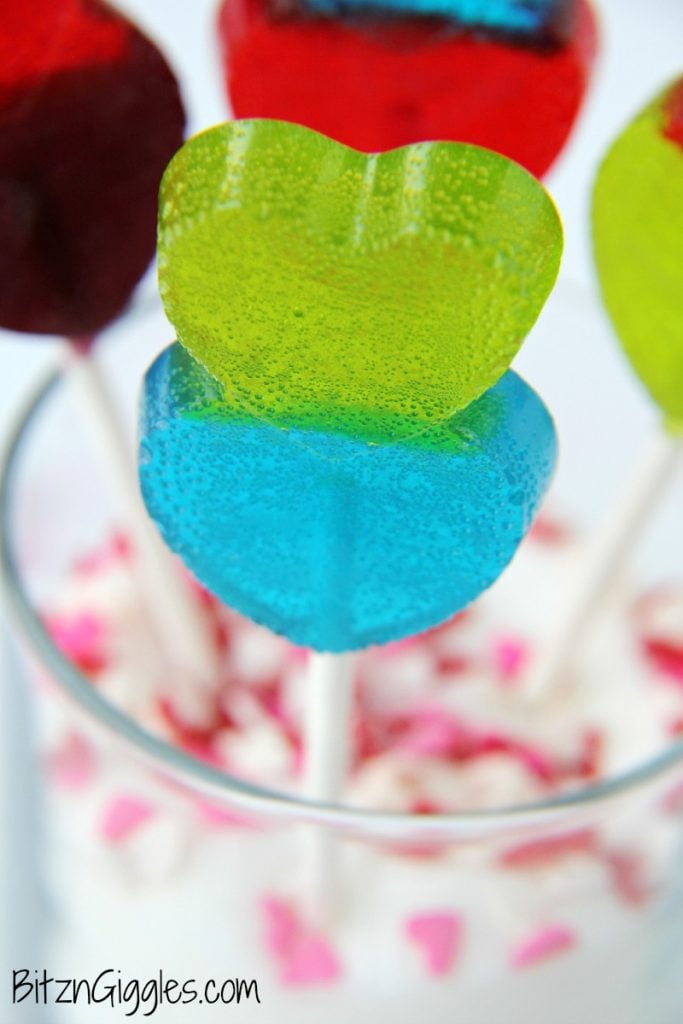
- Place the hard candy into your mold. The amount of candy you place into the mold depends on the size of the mold. For my mold, I used two Jolly Ranchers in this first step. Have fun with the colors! Be creative!
- Position your lollipop sticks into the mold.
- Place the mold into the oven for 10 minutes. The candy should be pretty well melted.
- Open the oven and place two MORE Jolly Ranchers on TOP of the already melted candies. Why? Because you need to fill the mold completely.
- Now put the mold back in the oven and allow to bake for about 8 more minutes or until the next set of candies is melted completely.
- Before removing from the oven, make sure your sticks are positioned nicely into the candy so when you take the pops out to cool, they're pushed into the pops nicely.
- Allow the lollies to cool for about an hour before you pop them out of the mold.
Notes
- Choosing the Right Candy: Use hard candy that melts evenly and has vibrant colors for your Easy Lollipops. Popular choices include Jolly Ranchers, Life Savers, or any other hard candy of your choice. Experiment with different flavors and colors to create a variety of lollipops that appeal to your taste preferences and aesthetic preferences.
- Even Melting: To ensure that your lollipops have a smooth and uniform texture, preheat your oven to the correct temperature (300 degrees Fahrenheit) and bake the candies in the silicone mold for the specified time. Keep an eye on the candies while they're in the oven to prevent them from overheating or burning. If needed, adjust the baking time slightly based on your oven's performance and the type of candy you're using.
- Proper Cooling and Setting: Allow the lollipops to cool completely in the silicone mold before attempting to remove them. This ensures that they are set properly and hold their shape once removed from the mold. The cooling time may vary depending on the size and thickness of your lollipops, but allowing them to cool for about an hour should be sufficient. Once cooled, gently pop the lollipops out of the mold and enjoy your homemade treats!
Shari Rannells
I have done these but they come out sticky. Any ideas on how to keep this from happening?
Sara
The lollipops do have a bit of a textured feel rather than being perfectly smooth. Are you allowing them to cool long enough?
Mona
Did you oil your mold before putting the Jolly ranchers to melt? I'm planning on using the white hard candy mold. I wonder if I have to oil the mold first? Thanks for the directions. Can't wait to make these as soon as the mold arrives in the mail.
Sara
Nope! As long as you're using a silicone mold, you should be able to pop them right out without any oil! Good luck!
Bonnie @ The Pin Junkie
Thanks for sharing this delicious recipe at The Pin Junkie! It's part of today's Valentine dessert roundup!
Sara
How exciting, Bonnie! Thank you!
Pauline Molinari
ingenious! Thanks for sharing on the Monday Funday Party!
Theresa @DearCreatives
First off Jolly Ranchers are our favorites, second those are so cute! & I never knew how easy. I must try this. Thanks for sharing at this week's party! Pinned...
Cheryl Kirkness
I love how simple this is! Thank you for linking up to Party Time and we hope to see you again next week!
Cate @ Chez CateyLou
These are so cute, and such a creative use of jolly ranchers! I love this idea! Also, quite jealous of your trip to the DR!! Soak up some sun for me 🙂
Sara
I will certainly do what I can to relax while on the trip! I'm sure looking forward to it. Thanks for stopping by to comment!
Annie @Maebells
This is so clever!! Perfect special treat for Valentines day!
Sara
Thanks, Annie!
Tonia from TheGunnySack
These are so cute! I'm going to show them to my teen so that she can try making them.
amanda @ fake ginger
These are so fun!
Sara
Thanks so much, Amanda!
Deb@ Cooking on the Front Burner
These are super adorable - great recipe for Valentine's day!!
Sara
Thank you, Deb! I love how simple they are to make!
Kelley
These look so easy to make! Holy moly, why haven't I tried them before?! Thanks for the great idea!
Sheena @ Hot Eats and Cool Reads
These are so stinkin cute!!! I love Jolly Ranchers too and cannot wait to make these with my daughter!!
Sharon - Her Organized Chaos
I would have NEVER thought to do this! It's so simple yet makes a statement. You could do this for any party! If I had known, I could have done this for my son's Mickey birthday party. I would love if you linked this up to Totally Terrific Tuesdays this week! hope to see you! Thanks for sharing.
Sharon
herorganizedchaos.com
Sara
I love that you can get creative with these, Sharon and they certainly look quite impressive for how simple they are to make!