
Want to Save This Recipe?
The leaves are starting to fall off of the trees, we are losing three minutes of daylight each day this month and Old Man Winter is starting to knock on the door, reminding me to get the furnace checked, purchase new snow boots for the kids, figure out Halloween costumes and clear out some clutter so I can organize some closets and rooms in a few months when I begin my annual hibernation!
BUT. . .before I do any of that, the beginning of October is when I start decorating for Halloween. I normally have my pumpkins out already at the end of September, but I'm late this year!
So. . .this year I came up with a pretty great idea for my jack o'lanterns. Have you purchased those battery-operated tea lights and strobes you can put in your pumpkins to make them light up at night? Me too.
I didn't like always having to go outside to turn them on each night. In fact, the only time last year I really made an effort to turn EVERYTHING on, was on Halloween night. So, how do you achieve that eerie glow without all the hassle? Let Mother Nature do all of the work, of course.
This Solar Light Jack O'Lantern charges all day in the sun and turns on automatically each night to wow your neighbors and guests without you having to do a thing! I know, I know. Pretty cool, right? How do you make your own? Let's get started!
Solar Light Jack O'Lantern
Materials
- Small-medium sized pumpkin
- Outdoor solar light (just the top piece that holds the battery)
- Knife or pumpkin carving tool
- Spoon to scoop out the insides of the pumpkin
- Pen or pencil
- Piece of paper
- Scissors
- Small disposable bag to put pumpkin "innards"
So, you know those little solar lights that go on clearance at the end of the summer? Did you snatch some of those up? Or if you didn't, the dollar stores also tend to carry Halloween-themed ones in the fall, so make sure to check it out. Your other option is to "borrow" some of the lights you may have in your backyard (or your neighbor's yard- KIDDING!) and put them back in place after Halloween.
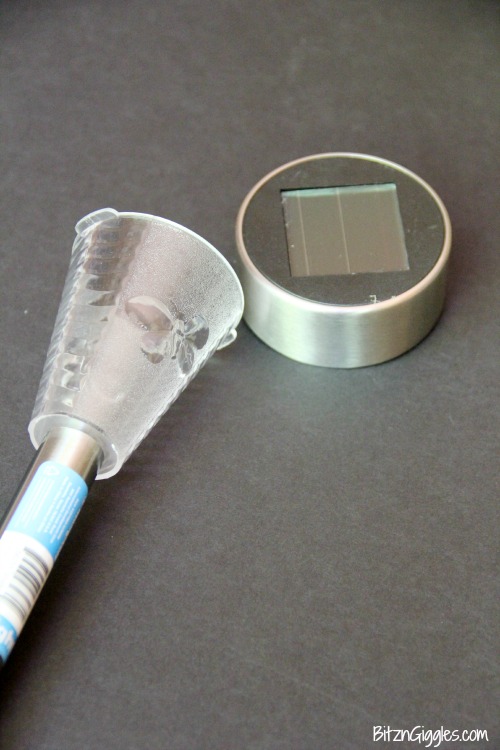
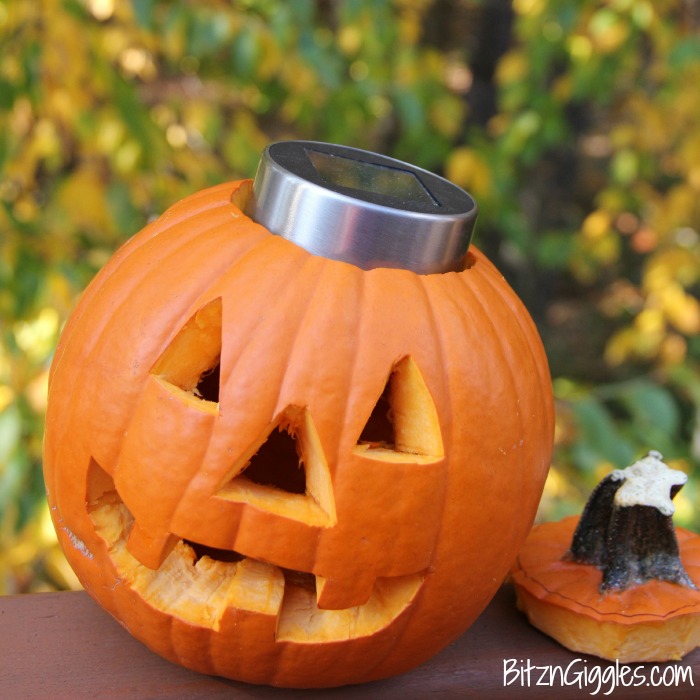
Once you have your solar light, take it apart. The only piece you'll need for this project is the top of the light or the round piece with the solar panel and battery compartment.
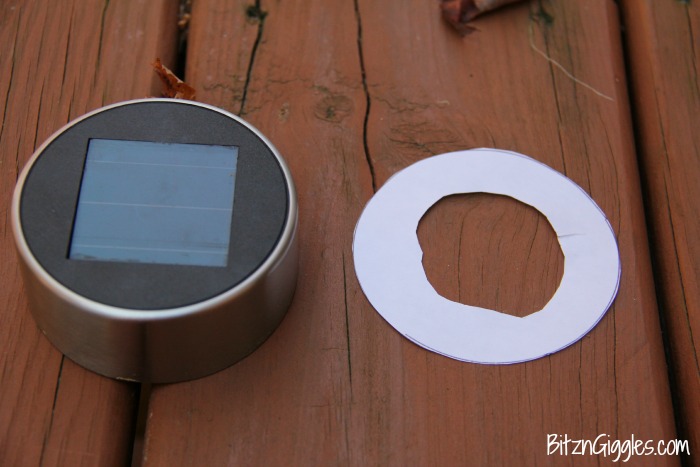
The next thing you're going to do is measure for the size of hole you'll need to make at the top of the pumpkin to fit the solar light.
Take your piece of paper and trace a circle around the perimeter of the solar light piece. Then cut it out. Cut another circle in the middle of the white piece to ensure it fits over the stem of the pumpkin.
Next. . .
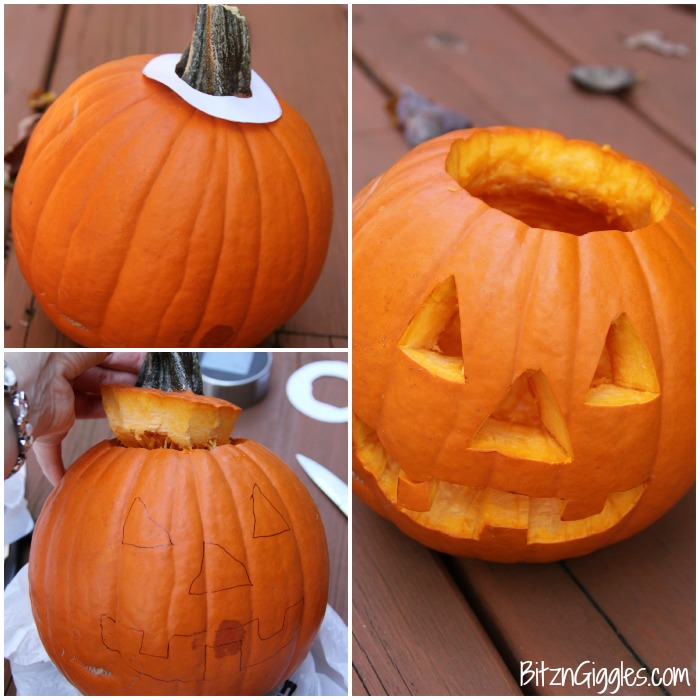
- Place the white circle over the stem of the pumpkin and use your pen or pencil to trace around the white circle on the top of the pumpkin.
- Use a stencil or just draw a face on your pumpkin freehand. I just went ahead and drew one on.
- Take your knife or carving tool and cut out the top of the pumpkin.
- Scoop out the insides of the pumpkin into the disposable bag to throw out later.
- Use your knife or carving tool to carve the face out of the front of the pumpkin.
I'm not a professional artist nor am I the greatest at carving pumpkins, but I AM DETERMINED. The worst part of all of this was scooping out the pumpkin. Ick. You can see in the picture how I really didn't even want to lift the top of it off. The whole time I was scooping out the pumpkin I had this look on my face like I was cleaning up a horrid mess. You know the kind I'm talking about. LOL
When it got to the carving part, I broke my pumpkin's tooth. Can you see how it's just hanging there in the photo? Jeepers. I needed a quick fix. Did you know glitter glue can repair jack o'lantern teeth? Yep, it can.
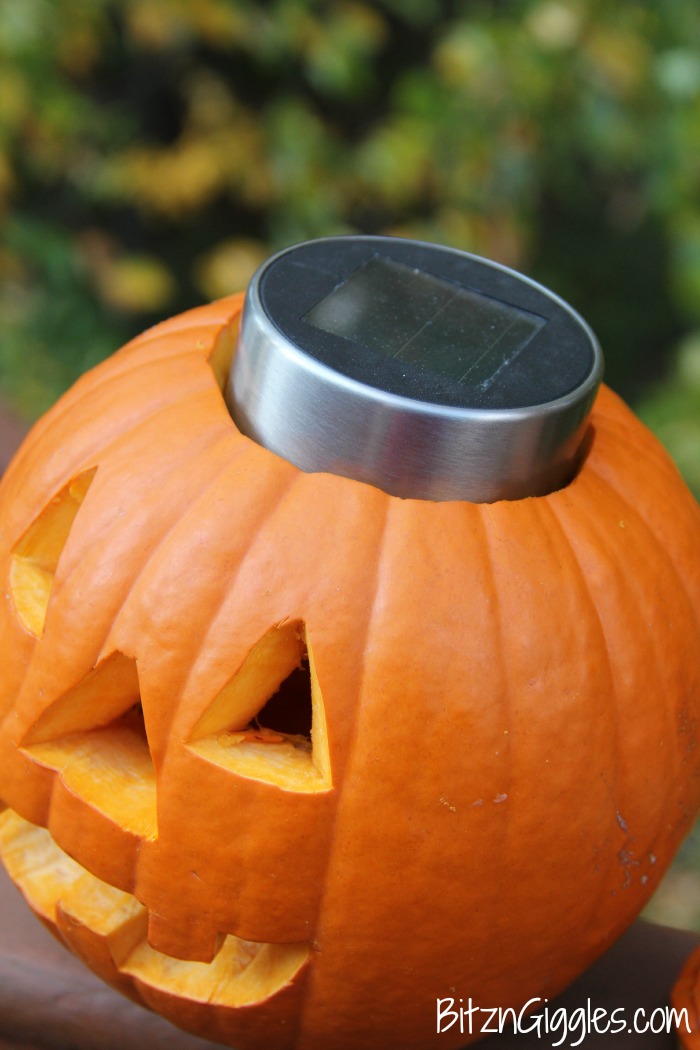
So here's the best part. Before you put your solar light in, it helps to keep it outside for the day, so when you insert it into your finished pumpkin it's all charged up and ready to go. As soon as I slid the light into the top, I took the pumpkin into the house and ran to my bedroom closet. Turned out the light and saw. . .this.

Brilliant. It lit up wonderfully and I was a happy camper. Trying to get a good photo in a completely dark room was another challenge I won't go into right now.
Can I just say that I LOVE this pumpkin? There's no maintenance whatsoever, and the fact that it uses natural means to light itself is probably the coolest thing ever. This is I think one of the simplest but useful seasonal projects I've ever done. Can't wait to see if my neighbors will follow suit! I sure hope you try it out! You're sure to love it, too!


Solar Light Jack O'Lantern
Materials
- Pumpkin
- Outdoor solar light
- Knife or pumpkin carving tool
- Spoon
- Pen or pencil
- Paper
- Scissors
- Disposable bag
Instructions
- Once you have your solar light, take it apart. The only piece you'll need for this project is the top of the light or the round piece with the solar panel and battery compartment.
- The next thing you're going to do is measure for the size of hole you'll need to make at the top of the pumpkin to fit the solar light.
- Take your piece of paper and trace a circle around the perimeter of the solar light piece. Then cut it out.
- Cut another circle in the middle of the white piece to ensure it fits over the stem of the pumpkin.
- Place the white circle over the stem of the pumpkin and use your pen or pencil to trace around the white circle on the top of the pumpkin.
- Use a stencil or just draw a face on your pumpkin freehand. I just went ahead and drew one on.
- Take your knife or carving tool and cut out the top of the pumpkin.
- Scoop out the insides of the pumpkin into the disposable bag to throw out later.
- Use your knife or carving tool to carve the face out of the front of the pumpkin.
- Before you put your solar light in, it helps to keep it outside for the day, so when you insert it into your finished pumpkin it's all charged up and ready to go.
Notes
- Measure Twice, Cut Once: Take accurate measurements for the hole you'll need to make at the top of the pumpkin to fit the solar light. Trace the perimeter of the solar light piece onto paper and cut it out. Double-check that the size of the circle matches the top of the pumpkin before cutting to ensure a snug fit for the solar light.
- Safety First: Exercise caution when carving the pumpkin to avoid injuries. Use a sharp knife or pumpkin carving tool, and always carve away from yourself to prevent accidents. Supervise children closely if they are involved in the carving process, and consider using safer alternatives such as pumpkin carving kits with serrated blades designed for safer carving.
- Charge the Solar Light: To ensure optimal illumination, let the solar light charge outside for the day before inserting it into the finished pumpkin. This allows the solar panel to absorb sunlight and charge the battery fully, ensuring that the jack o' lantern shines brightly throughout the night.
Block blast
I love the idea of using solar lights for a Jack O'Lantern! It’s such an eco-friendly way to celebrate Halloween while adding a charming touch to the decorations. I can’t wait to try this out for my own yard!
hiwin
I love the idea of using solar lights for a Jack O'Lantern! It's such a fantastic way to be eco-friendly while still celebrating Halloween. The glow from solar lights adds a unique touch that traditional candles can't replicate. I can't wait to try this out for my decorations this year!
capcut apk
I absolutely love this idea! The Solar Light Jack O'Lantern is such a creative twist on a Halloween classic. It’s eco-friendly and adds a unique glow to decorations. Can’t wait to try this with my family! Thanks for sharing!
h89 Slots
I absolutely love this idea! Solar Light Jack O'Lanterns are a perfect blend of spooky and sustainable. Can’t wait to try making my own for Halloween! Thanks for the inspiration!
sss Facebook Website
What a creative way to celebrate Halloween! I love the idea of using solar lights for a Jack O'Lantern – it's eco-friendly and adds a charming glow to the decorations. Can't wait to try this out for my own yard! Thanks for the inspiration!
I think I would like to cut my hole just behind the stem, so I don’t have to take the stem off and I think it still will work
I think I would like to cut my hole just behind the stem, so I don’t have to take the stem off and I think it still will work
Judith
This is the neatest way to light pumpkins! I can't wait to try this.
Marlene Schlegel
Very Cool!!! Love it!!!!