Want to Save This Recipe?
Oh, our little Cora. She just turned four at the end of September and it's been such a joy to watch her learn and grow. Our neighborhood is filled with little girls, and they play together whenever they have the chance. Around here we do a lot of coloring, dressing up and pretend play. We have wands and tiaras and lots and lots of costume jewelry.
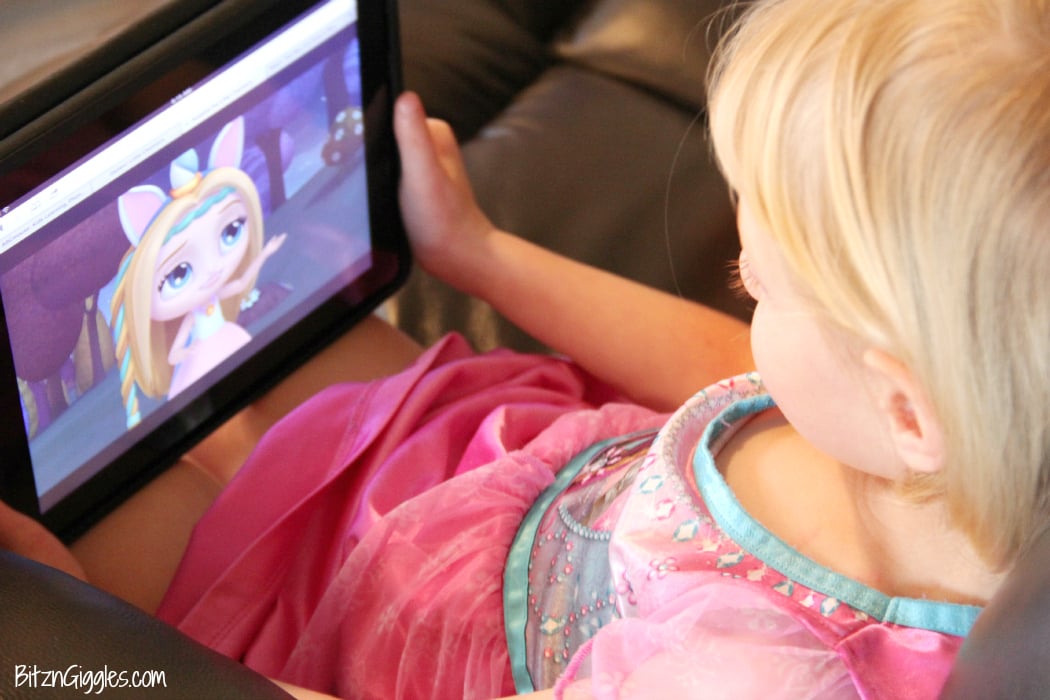
In addition to all of the "garb," Cora has fallen in love with Little Charmers on Nick Jr. Have you ever seen the show? It's super cute and perfect for preschool kids ages 3-5. Little Charmers is all about the magical misadventures of three best friends: Hazel, Lavender and Posie - not to mention their adorable pets, Seven (Hazel's cat), Flare (Lavender's baby dragon) and Treble (Posie's owl).
In the magical land of Charmville, the girls are three "Charmers-in-Training (C.I.T's) who use their imaginations and teamwork to fix magical mishaps. Along the way they find that their most important power, however, is true friendship, and learn that a mix of teamwork and self-confidence can overcome anything that comes their way. It just goes to show that anything is possible when you work together. Super sweet message. Love it.
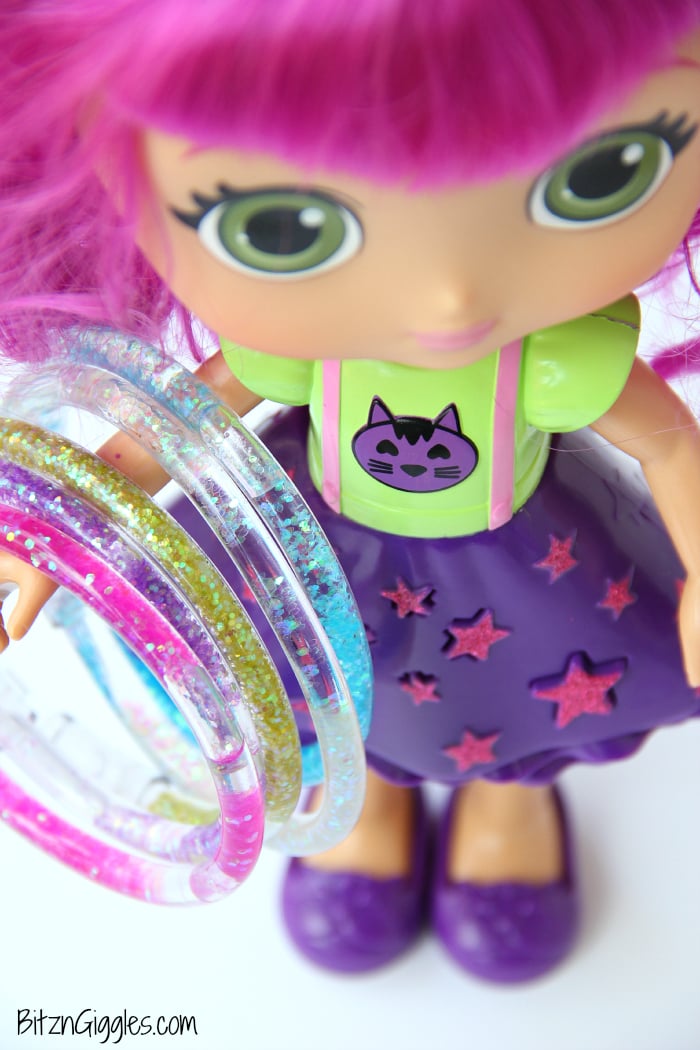
You can imagine Cora's excitement when she received her very own Hazel doll in the mail the other day, along with Flare and Lavender's magical wand! She couldn't wait to get it all out of the box and into her room. She started packing everything into her backpack so she could go and show it all off to her little BFF's.

As you can imagine, the other little girls thought her new toys were super cool and their favorite aspect of Hazel was her disappearing cape. Heck, I will admit I sat there and played with Hazel's cape, too - until the girls came and took her away from me. 🙁
You can probably guess what's on Cora's friends' holiday lists now. And one doll just isn't enough. They all want the full set of dolls. I've been hearing it all week, "Mom, when are we getting Hazel's friends?" Sigh.
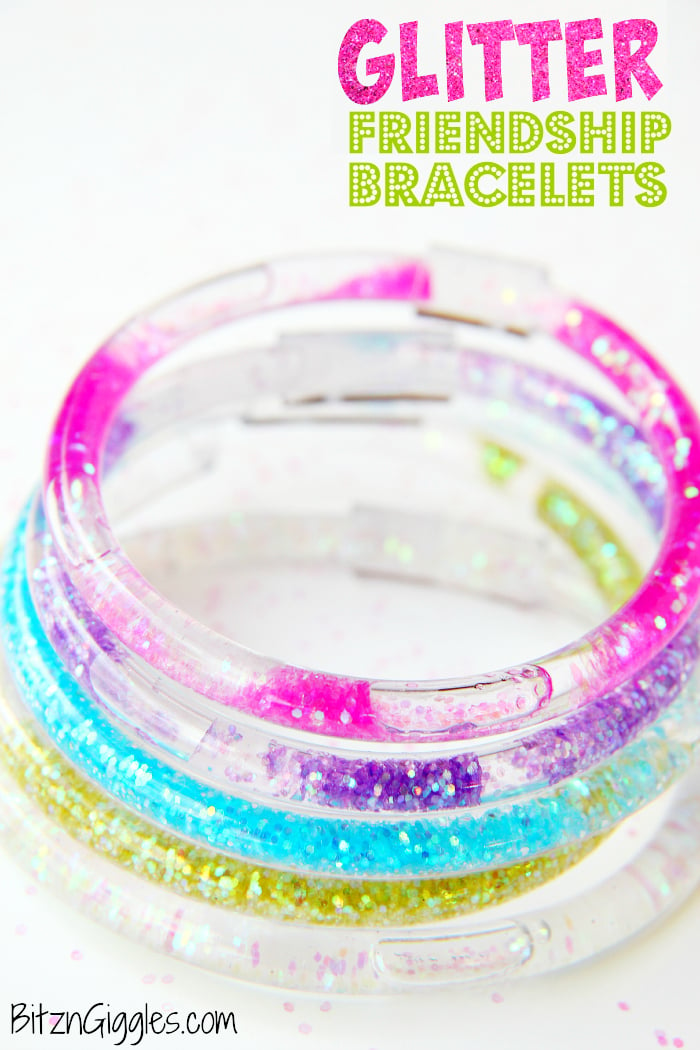
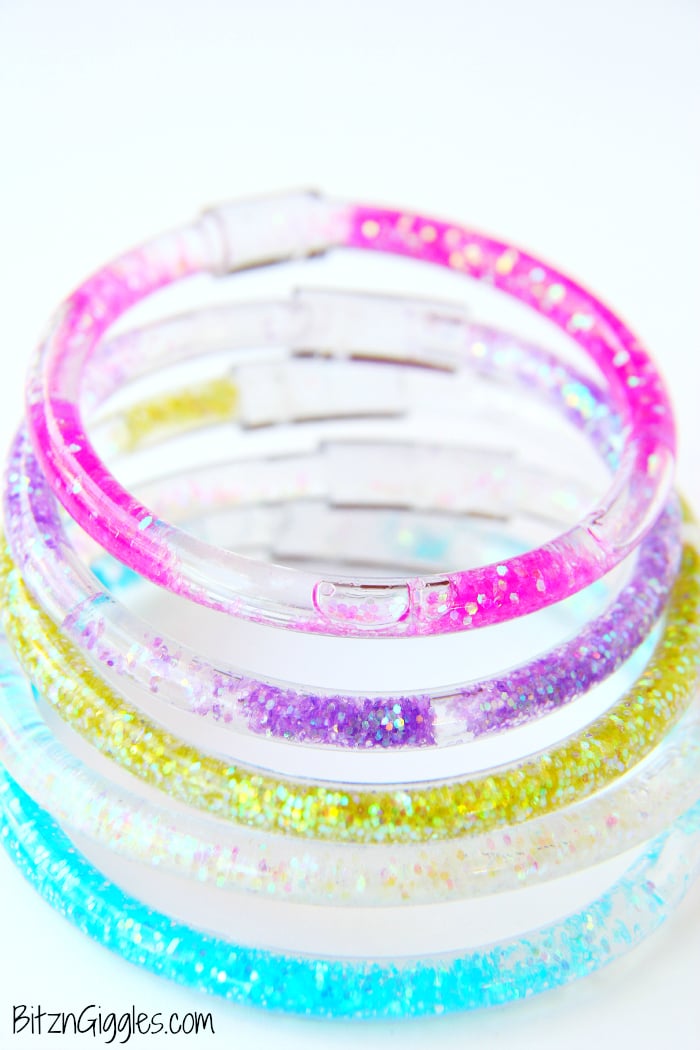
To hold the girls over until the holidays arrive, I thought it would be fun to create some magical Glitter Friendship Bracelets they could all wear that fit perfectly with the Little Charmers theme.
Do you remember those water-filled glitter bracelets from the 80's? I think it was the 80's - or maybe the 90's? I'm obviously getting way too old. What I do remember is that my friends and I adored these little bracelets growing up. They were mesmerizing; so much fun to look at.
Today, I'm going to show you how to make your own! Here's what you're going to need to get started!
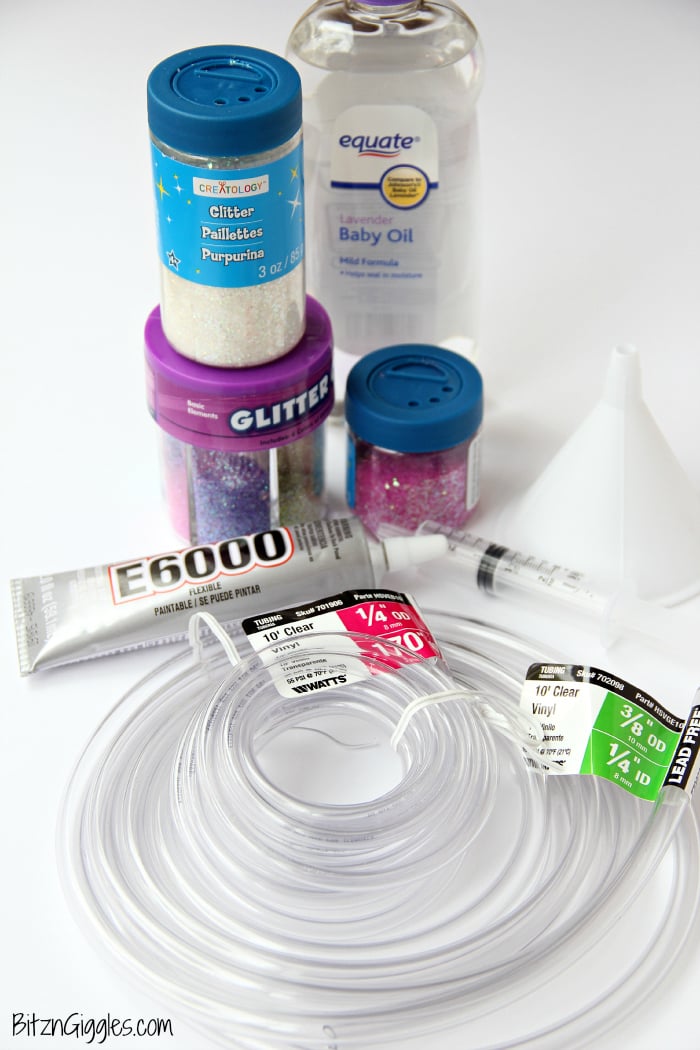
Materials:
- ¼" clear vinyl tubing (can be found at hardware/home improvement stores)
- ⅜" clear vinyl tubing (can be found at hardware/home improvement stores)
- Baby oil
- Water (not pictured)
- Scissors (not pictured)
- Assorted colored glitter
- Oral medication syringe
- Mini funnel (I didn't have one, so I tried to use the funnel in the photo above - it was a bit too large so I ended up using the syringe for the glitter as well. A decorating tip for piping on frosting may also work.)
- E6000 Craft Adhesive
So, once you've gathered all of your materials, let me say a couple things about these bracelets before we begin making them.
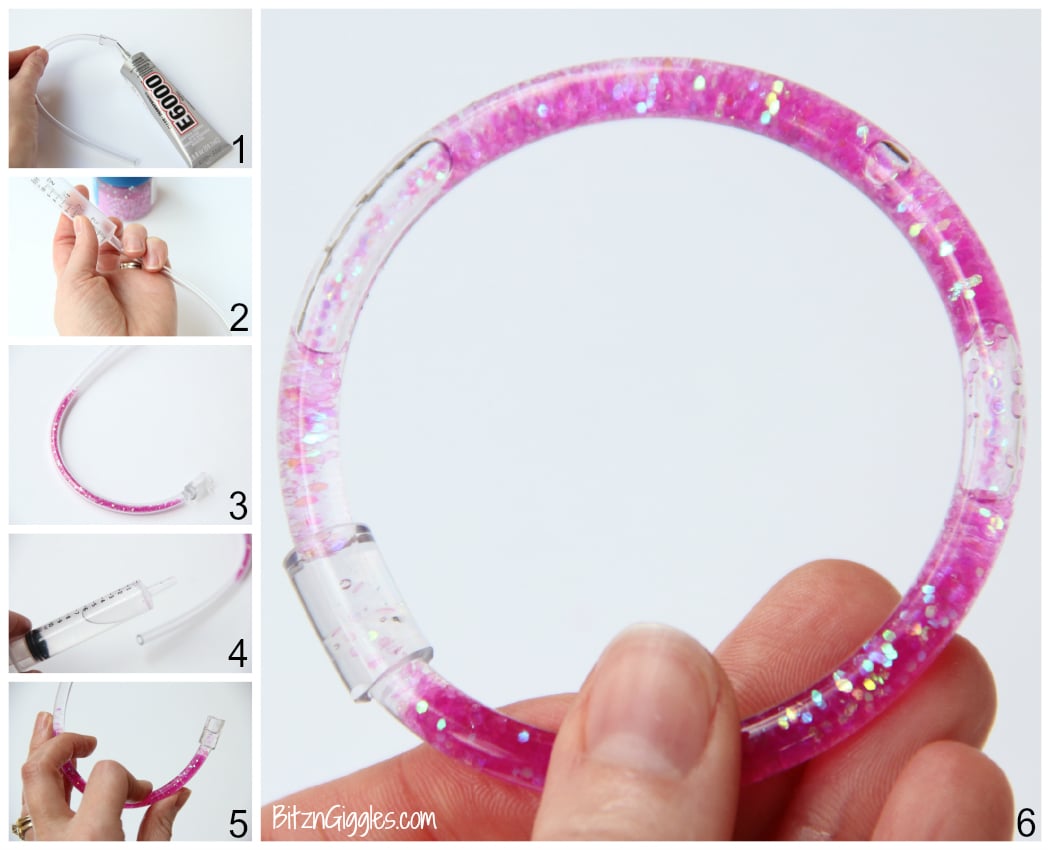
You will use two different sizes of vinyl tubing for this craft. You can either use the larger tubing as the bracelet and the smaller tubing as the "plug," or you can use the smaller tubing as the bracelet and the larger tubing as the "connector." If you go the "plug" route, the bracelet is more "seamless" or smooth all the way around. If you go the "connector" route, the connector is more visible on the bracelet but the bracelet, itself, is more flexible.
I decided to go the "connector" route for two reasons: I wanted the bracelets to be a bit thinner because I was making them for little girls and secondly, I liked the flexibility of the smaller tube, as well. The reasoning behind the half water, half baby oil mixture is two-fold also. The oil helps slow down the glitter a bit so it doesn't move too quickly within the bracelet. It will also ensure that the liquid remains in your bracelet much longer than just water would alone.
That being said, let's start crafting!
Instructions:
- Measure out and cut how much of the ¼" tubing you'll need to fit the child's wrist. Then, cut a small piece of the ⅜" tubing to act as the "connector" piece (see a close up photo of how this works in Step 6). Insert one end of the ¼" tubing in the ⅜" connector piece. Apply some of the adhesive into the open end of the connector piece. Allow to dry 10 minutes.
- Insert the end of the mini funnel or syringe into the other side of the ¼" tubing without the connector.
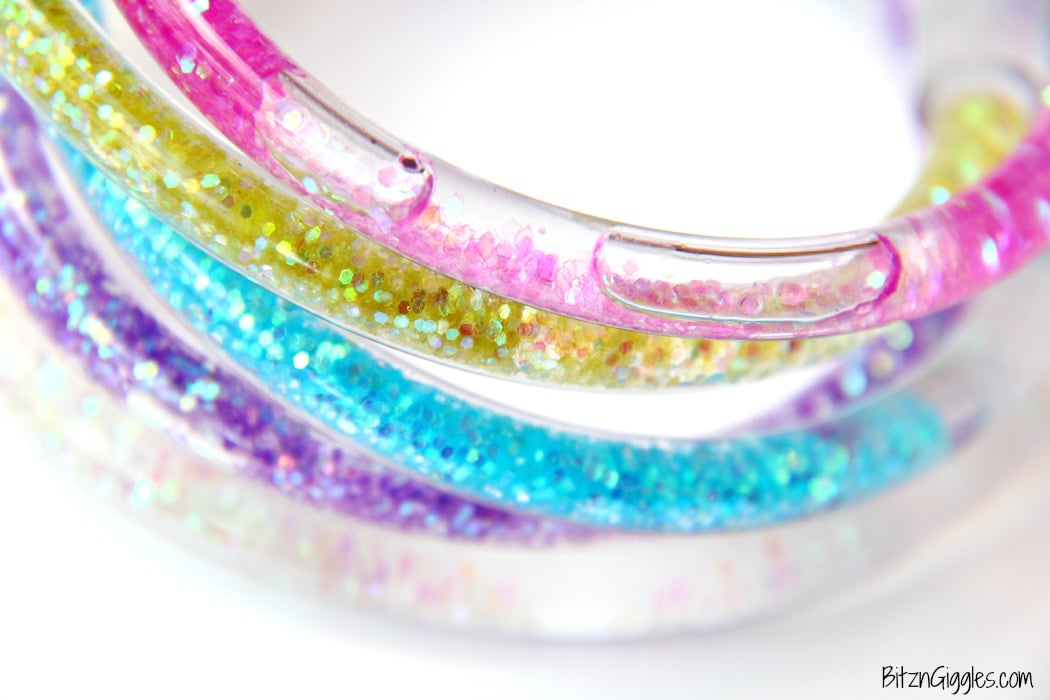
- Pour glitter into the funnel and fill the tubing about ¾ full (If you want more movement within the bracelet, don't add as much glitter).
- Fill your syringe with half water, half baby oil (shake it a little to mix) and start filling the tubing until it covers the glitter completely and fills most of the tubing.
- While holding the ends of the tubing upright, apply a bit more adhesive to the connector end and insert the other end of the tubing into the connector to form the bracelet.
- And there you have it! How cool is that?! Now make some more!
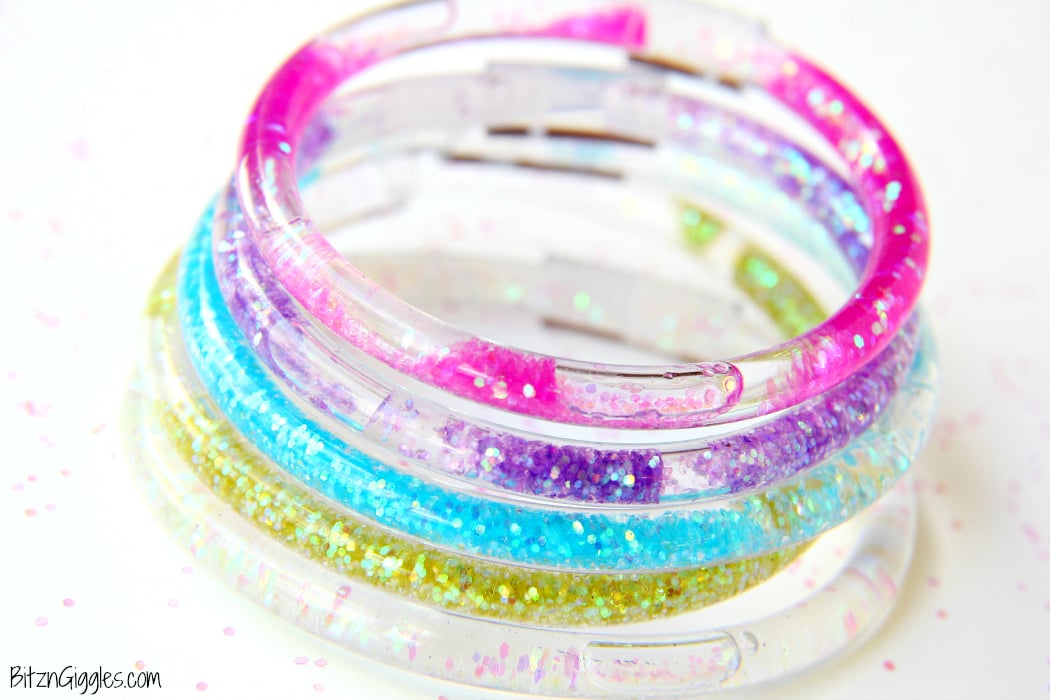
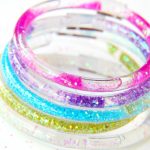
I couldn't help but make a bracelet for ever color of glitter I had. Oh, and we're making more because one bracelet per friend just isn't enough, per Cora.
I get it. I had to have at least 3-4 of these bracelets on my arm at one time, too. I'm pretty sure when the other moms in the neighborhood see these, I'm going to get some additional requests to make "a few more." Although, since they have the tutorial, they may just go ahead and make their own (and then maybe we can trade, too ;). These bracelets are just adorable. I'm so excited to see the girls' faces when Cora hands them out.
Go ahead and make these happen at your house! You're going to love them!
Glitter Friendship Bracelets
Materials
- ¼ Clear vinyl tubing
- Baby oil
- Water
- Scissors
- Assorted colored glitter
- Oral medication syringe
- Mini funnel
- E6000 Craft Adhesive
Instructions
- Measure out and cut how much of the ¼" tubing you'll need to fit the child's wrist. Then, cut a small piece of the ⅜" tubing to act as the "connector" piece (see a close up photo of how this works in Step 6). Insert one end of the ¼" tubing in the ⅜" connector piece. Apply some of the adhesive into the open end of the connector piece. Allow to dry 10 minutes.
- Insert the end of the mini funnel or syringe into the other side of the ¼" tubing without the connector.
- Pour glitter into the funnel and fill the tubing about ¾ full (If you want more movement within the bracelet, don't add as much glitter).
- Fill your syringe with half water, half baby oil (shake it a little to mix) and start filling the tubing until it covers the glitter completely and fills most of the tubing.
- While holding the ends of the tubing upright, apply a bit more adhesive to the connector end and insert the other end of the tubing into the connector to form the bracelet.
- And there you have it! How cool is that?! Now make some more!
Notes
- Select Safe and Non-Toxic Materials: Ensure the materials you use are safe, especially if making these bracelets with children. Opt for clear vinyl tubing that is non-toxic and free from harmful chemicals. When choosing glitter, look for non-toxic options specifically labeled as safe for crafts and skin contact. Additionally, use baby oil and water for the filling mixture, as these are gentle on the skin and safe for use in crafts.
- Experiment with Glitter Amounts: The amount of glitter you add to the tubing can impact the overall appearance and movement of the bracelet. If you prefer a more subtle sparkle, add less glitter to the tubing. Conversely, if you want a bold and dazzling effect, fill the tubing with more glitter. Experiment with different glitter colors and sizes to create unique and personalized bracelets that reflect each friend's style and personality.
- Allow Sufficient Drying Time: Patience is key when making these bracelets to ensure they hold together securely. Allow ample time for the adhesive to dry completely before wearing or handling the bracelets. Follow the manufacturer's instructions for the adhesive you choose and consider allowing it to cure for longer than the minimum recommended time to ensure maximum strength and durability. Once dry, the bracelets will be ready to share with friends and add a touch of sparkle to any outfit!
Terra
Hi! These are so cute and I'm trying to make some with my kiddo but I can't get the glitter to move at all. I'm using the 1/4 inch od tube for the bracelet. I have tried just glitter, adding water, water and oil and just oil. I've added more and less glitter and using fine and chunky glitter. Do you have any suggestions on what is going wrong?
Thanks!
Sara
Hi Terra! Sorry you're running into some problems with the bracelets. You'll definitely need the combination of the water and the oil and I would opt for fine glitter vs. chunky and less glitter vs. more. If you have too much glitter in the bracelets, it will clump up and not move. I'm not sure if anything I said was helpful because it sounds like you've been doing your own experimenting but I sure hope you get that glitter moving inside the bracelets!
Cyndy
What do you use or how do you get the printing off the tubing? The tubing I found has codes stamped on it nothing I’ve tried gets it off.
Sara
Hi Cyndy, I know the tubing I purchased had some printing on it as well but it was only on parts of the tubing. I used the completely clear portions to make my bracelets.
J
awesome bracelets! thanks for posting!
Michelle @ Blackberry Babe
How fun! My nieces would love these!
Carrie @Frugal Foodie Mama
How fun are these?? And it was the 80's- I was child of the 80's and I remember having a whole stack of glitter bracelets. 😉 I have never heard of Little Charmers, but I have a feeling my 3 year old daughter would love that show- so cute!
Nancy | The Bitter Side of Sweet
We were just thinking of snow day projects to do once the winter hits, this is something I am adding to the list! My girls would love it!
Sara
Yes, snow day projects. I need to get my list together, too! I hope you make these with your girls! They're so much fun!
Jenny B | Honey and Birch
I used to have birthdays like this as a kid - so fun!
Sherri@The Well Floured Kitchen
What a cute idea! I know every little girl would love to wear a whole bunch of these on her arm. Such fun colors too.
Jo-Anne
Haven't seen this show as yet but reckon my two granddaughters would like the show and the bracelets
Sara
I think the girls would love it, Jo-Anne, and the bracelets would be a fun activity to do together!
Marlene Schlegel
Cute blog and idea for little girls! Love the pretty little girl too!!
Amanda | The Chunky Chef
These are SO cool!! I remember those bracelets from when I was little (I grew up in the 80's too)... my daughter would absolutely love these 🙂
Sara
I know, right?! I'm seriously making some for me, too! LOL