
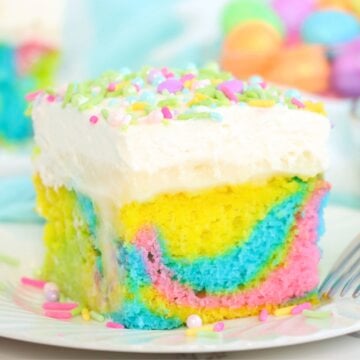
This vibrant, swirled dessert is the Best Easter Pie you’ll ever make! With its creamy texture, eye-catching colors, and a buttery Nilla wafer crust, it’s as easy to prepare as it is beautiful. Whether you're hosting an Easter brunch or looking for a colorful dessert, this pie will be the highlight of your holiday table!

Want to Save This Recipe?
Celebrate Easter with a dessert that's both beautiful and delicious! The colorful pastel swirls create a festive look, while the creamy filling pairs perfectly with the crunchy crust. Top it off with whipped cream and Easter sprinkles for a treat that will be the star of your spring celebrations!
If you're looking for more festive treats to add to your Easter celebration, be sure to check out my Easter Cake Roll, Easter Trifle Dessert, and Easter Peanut Butter Eggs. They're colorful, fun, and perfect for celebrating the season!
Jump to:
Why You'll Love This Recipe
- Great Make-Ahead Dessert: Since this pie needs time to set in the fridge, it’s perfect to make ahead of time. That means less time in the kitchen and more time enjoying your celebration!
- Crowd-Pleaser: With its simple and widely adored ingredients, this Easter pie is sure to please even your pickiest of guests. It’s a must-have addition to your Easter feast!
- Fun and Colorful: Easter is the ideal time for bright pastel colors and sweet desserts, and this pie perfectly combines both! With it’s fun, vibrant colors, this pie is almost too beautiful to eat!
Ingredients
Gather the ingredients below to make this no-bake Easter dessert!

- Nilla Wafers form a perfectly sweet and crunchy crust for the rich, creamy pie—just like they do in my Vanilla Cheesecake Bird Nests, another fun and festive spring treat!
- Sugar enhances the sweetness of the crust
- Butter binds the crust together and adds a hint of flavor
- Cream cheese is rich, smooth, and makes for a delicious cheesecake filling
- Powdered sugar makes the filling sweet without making it grainy
- Vanilla extract adds a sweet, vanilla flavor to the filling
- Sweetened condensed milk makes the filling even more velvety and smooth
- Heavy whipping cream creates the light, fluffy texture of the filling
- Gel food coloring (pink, blue, yellow, and purple) brings this pie to life with its vibrant pastel swirls of color
See recipe card for full information on ingredients and quantities.
Substitutions & Variations
- Crust Substitutions: In place of Nilla Wafers, you can use graham crackers or shortbread cookies.
- Other Filling Flavors: Use different extracts to create different filling flavors. A hint of almond or cinnamon can create a subtle change in flavor for a bit of variation.
- Decorating Options: You can pipe whipped cream around the edge of your pie, or top it with candy crumbles, festive sprinkles, or marshmallows.
How to Make The Best Easter Pie
Once you've gathered all your ingredients, preheat the oven to 350ºF and follow the steps below for a fun and delicious and easy Easter dessert.

- Step 1: Make the crust by mixing crushed Nilla wafers with sugar and butter, pressing into a pie plate, baking, and cooling.

- Step 2: In a large mixing bowl, beat cream cheese with a hand mixer until smooth. Add powdered sugar, vanilla, and sweetened condensed milk. Beat again until mixture is uniform.

- Step 3: Beat heavy cream to stiff peaks, then fold into the cream cheese mixture.

- Step 4: Separate mixture into 4 bowls equally. Add one color of food coloring to each bowl. Mix until colors are uniform.

- Step 5: Drop spoonfuls of each color into the crust and gently swirl with a toothpick for a marbled effect.

- Step 6: Chill for 4 hours, then top with whipped cream and sprinkles.

Helpful Tips
- Chill the Crust: To help your crust set, you can keep it in the fridge while you prepare the filling. This can help prevent it from becoming soggy once the filling is added.
- Swirling Tips: You can use a toothpick, skewer, or knife to gently swirl the colors together. Be careful not to overmix.
- Add Food Coloring Gradually: To keep your colors light, gradually add food coloring until it is the desired shade. Adding too much can leave you with dark colors instead of pastel.
- Slice with a Warm Knife: To get cleaner slices, run a knife under warm water before slicing.

Recipe FAQs
This recipe is best served after 4-24 hours of chill time. As long as you serve it within a day or so of making it, it will maintain its freshness and creamy texture. Just keep it covered in the refrigerator until you’re ready to decorate, serve, and enjoy!
If you want to use a springform pan instead of a pie plate, you absolutely can. The removable base of springform pans makes it super easy to serve and slice your pie.
Absolutely. A graham cracker crust can be used in place of Nilla wafers if preferred, or even a store-bought crust for convenience.

Storage & Freezing Instructions
Storage Instructions
To store your Easter pie, keep leftovers covered tightly in the refrigerator for up to 3 days.
Freezing Instructions
This recipe can be frozen for up to 2 months. Let thaw in the fridge overnight before serving.

More Easter Recipes You'll Love
Looking for other festive Easter recipes like this? Try these:

Did you try this recipe?
If you decide to try this festive easter pie recipe or any other recipe on my website, please leave a ⭐️ star rating and let me know how it went in the 💬 comments below! I’d love to hear from you!
Best Easter Pie
Ingredients
For the Crust
- 60 Nilla Wafers
- ¼ cup sugar
- ⅓ cup butter (melted)
For the Filling
- 8 oz cream cheese (softened)
- ½ cup powdered sugar
- 1 teaspoon vanilla extract
- ½ cup sweetened condensed milk
- 1 cup heavy whipping cream
- Gel food coloring (pink, blue, yellow, and purple)
Instructions
For the Crust
- Preheat oven to 350ºF.
- Crush Nilla wafers in a food processor or by hand in a large ziploc bag.
- Transfer Nilla wafer crumbs to a medium mixing bowl. Add sugar and melted butter. Work together with a fork.
- Transfer mixture to a 9-inch pie plate. Press it firmly into the bottom and up the sides.
- Bake for 10 minutes.
- Allow to completely cool.
For the Filling
- In a large mixing bowl, beat cream cheese with a hand mixer until smooth.
- Add powdered sugar, vanilla, and sweetened condensed milk. Beat again until mixture is uniform.
- In a separate small mixing bowl, beat heavy whipping cream until stiff peaks form.
- Gently fold the heavy whipping cream into the cream cheese mixture until smooth.
- Separate mixture into 4 bowls equally. Add one color of food coloring to each bowl. The amount of food coloring you will need depends on the type you are using.
- Mixture until colors are smooth.
- Randomly place spoonfuls of each color in the prepared crust.
- Using a toothpick, swirl the colors together to create a marble look. Be sure not to overstir.
- Chill pie in the refrigerator for at least 4 hours prior to serving.
- Top with whipped cream and Easter sprinkles.
Notes
- Chill the Crust: To help your crust set, you can keep it in the fridge while you prepare the filling. This can help prevent it from becoming soggy once the filling is added.
- Swirling Tips: You can use a toothpick, skewer, or knife to gently swirl the colors together. Be careful not to over mix.
- Add Food Coloring Gradually: To keep your colors light, gradually add food coloring until it is the desired shade. Adding too much can leave you with dark colors instead of pastel.
- Slice with a Warm Knife: To get cleaner slices, run a knife under warm water before slicing.
Leave a Reply